Sanger Order Pages Information Content
This page is to prepare the content to put in the information box on the sequencing order pages.
3. How to Package Samples
200 μL 96 well plate (>48 samples)
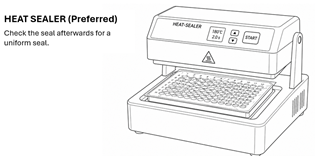
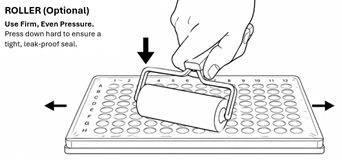
- Heat seal is preferred. If using a roller on an adhesive seal, press down firmly and evenly across the entire plate to make sure it is securely sealed across all wells.
- It is critical that plates are sealed well to avoid leakage and cross contamination between wells.
- Inspect the seal for bubbles. Bubbles can cause cross contamination if liquid can pass between wells.
- Wrap plates individually with bubble wrap to protect them.
- Do not use cap strips on plates. These can cause cross contamination between wells when pulling them off.
- Avoid stacking multiple plates on top of each other. The wells from the top plate can piece the seal of the plate underneath.
Agar Plate
- Wrap the agar plate in parafilm to prevent leakage and place inside a ziplock bag.
Separate Sample Types into Separate Bags
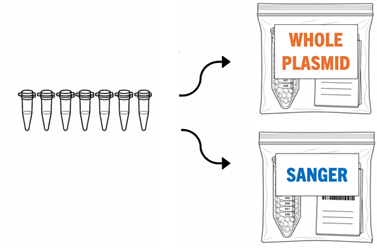
- It is important to separate Whole Plasmid and Sanger samples into different ziplock bags so the processing team can quickly sort packages and send the samples to the right sequencing group.
- Include the order confirmation page in each bag, with the order barcode and sample information visible through the bag.
|
|
|
4. How to Submit Samples
For more details, go to the How to Submit Samples webpage.
FAQ / Common Questions
Go to the FAQ page for all questions and answers regarding Whole Plasmid / Nanopore Sequencing.
SANGER PLATES ORDER PAGE - DONE
1. How to Prepare Samples
Go to the sample submission guidelines for ONT/Whole Plasmid samples or Sanger samples for instructions on how to prepare your samples.
2. How to Label Samples
Plates (>48 samples)
|
|
200 μL 96 well plate (>48 samples)
- Write the order number along the side of the plate using a thin sharpie marker.
- After the order number, write ONT for Oxford Nanopore Samples (whole plasmid) or an S for Sanger samples.
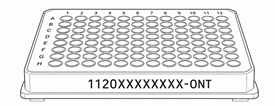
- Make sure all handwriting is legible.
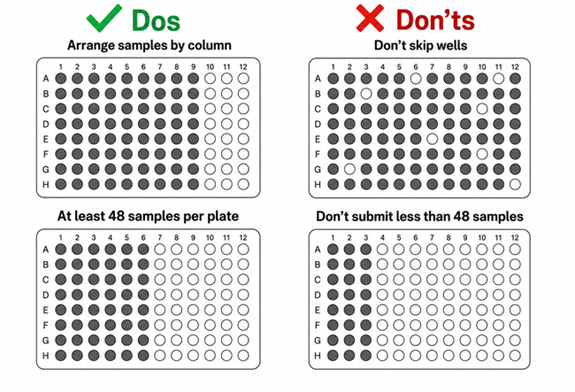
- Do not submit less than 48 samples per plate.
- Do not skip wells.
- Arrange samples by column (preferred.
|
|
|
3. How to Package Samples
Plates (>48 samples)
200 μL 96 well plates
|
- Heat seal is preferred. If using a roller on an adhesive seal, press down firmly and evenly across the entire plate to make sure it is securely sealed across all wells.
- It is critical that plates are sealed well to avoid leakage and cross contamination between wells.
- Inspect the seal for bubbles. Bubbles can cause cross contamination if liquid can pass between wells.
- Wrap plates individually with bubble wrap to protect them.
- Do not use cap strips on plates. These can cause cross contamination between wells when pulling them off.
- Avoid stacking multiple plates on top of each other. The wells from the top plate can piece the seal of the plate underneath.
Agar Plate
- Wrap the agar plate in parafilm to prevent leakage and place inside a ziplock bag.
Separate Sample Types into Separate Bags
- It is important to separate Whole Plasmid and Sanger samples into different ziplock bags so the processing team can quickly sort packages and send the samples to the right sequencing group.
- Include the order confirmation page in each bag, with the order barcode and sample information visible through the bag.
|
|
|
4. How to Order Online
Using the Excel Upload Template
- Minimum of 24 samples in each plate, and we highly recommend >48 samples per plate.
- Sample names and primer names can only consist of characters A-Z/a-z and numbers. Do not include spaces or other special characters.
- Every sample row must have an entry in the Primer column(s).
- Do not edit the columns titles or delete well labels.
- Do not enter a sequence of the enclosed/sent primer in the "Sequence to synthesize or Barcode for enclosed primer" column. This will result in the synthesis of the primer. Simply enter the primer barcode.
- Plate Barcode: optional on regular plates, required for PrePaid plate kits.
- Add. Service: optional
- Advanced options: select Standard or Power Read.
- Template Specification: only used for Power Reads.
- Plate Layout: provide the details of your sample by row or by columns
- Premixed: select the premixed option from the primer dropdown.
Example:
| Well Position |
*Sample Name |
Primer 1 |
Sequence to synthesize or Barcode for enclosed primer |
Primer 2 |
Sequence to synthesize or Barcode for enclosed primer |
Primer 3 |
Sequence to synthesize or Barcode for enclosed primer |
Primer 2 |
Sequence to synthesize or Barcode for enclosed primer |
| A1 |
MySample1 |
M13F43 |
|
M13F |
|
M13R49 |
|
|
|
| A2 |
MySample2 |
IOrderAPrimer1 |
GAT....GGC |
IOrderAPrimer2 |
TTA....ACC |
|
|
|
|
| A3 |
MySample3 |
SentPrimer1 |
443234 |
|
|
|
|
|
|
| A4 |
MySample3 |
Premixed |
|
|
|
|
|
|
|
Primers
How to Enter Primers in the Upload Forms
Submitting Samples in PrePaid Plate kits:
To use a PrePaid Plate Kit, enter the plate barcode number in the excel sheet. If you forget to enter the plate barcode, you will be prompted to enter the barcode in the second step of the ordering process (if such a plate is associated with your account). Please note the predefined services available with the different PrePaid plate kits.
|
How to submit Prepaid Plate PCR
|
How to submit Prepaid Plate DNA
|
5. How to Submit Samples
For more details, go to the How to Submit Samples webpage.
Dropbox
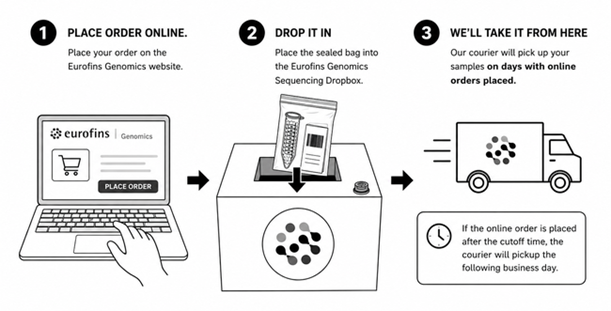
- Drop samples in the box the same day the online order is placed. The courier pickups samples on-demand, not every day. If it is past the cutoff time, the courier will pickup the following business day.
- Package your samples in padded mailer, padded envelope or cardboard shipping box. If you are reusing material, completely remove or cover any existing labels or warnings. Multiple orders may be shipped together in the same package, provided that each order is placed in its own sealed bag and includes the corresponding order confirmation.
- Ship samples at ambient (room) temperature. Do not include ice packs, dry ice, or other temperature-control materials.
- Visit the dropboxes webpage for more information on dropbox options and details.
- Search for dropboxes near to your location.
|
Digital Shipping Label
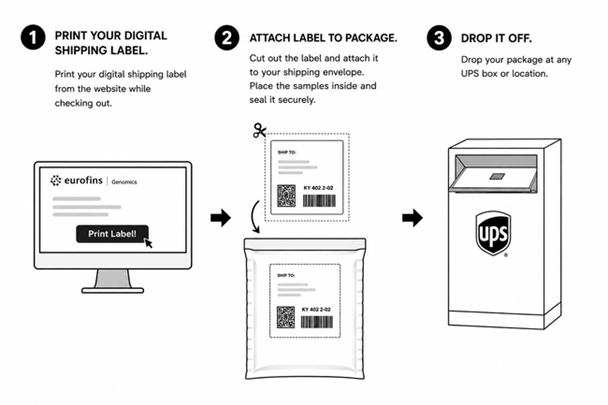
- Select the digital shipping label option during checkout. It is found under the "sample submission method" option. Digital shipping labels are free as long as the order amount meets the threshold for free shipping, which usually around $30-35.
- A digital shipping label will be automatically generated on the order confirmation page. Print it.
- Cut out the shipping label Select the print option to print the label.
- Package your samples in padded mailer, padded envelope or cardboard shipping box. If you are reusing material, completely remove or cover any existing labels or warnings. Multiple orders may be shipped together in the same package, provided that each order is placed in its own sealed bag and includes the corresponding order confirmation.
- Ship samples at ambient (room) temperature. Do not include ice packs, dry ice, or other temperature-control materials.
- For more information, visit the Digital Shipping Label webpage.
|
Ship Normally
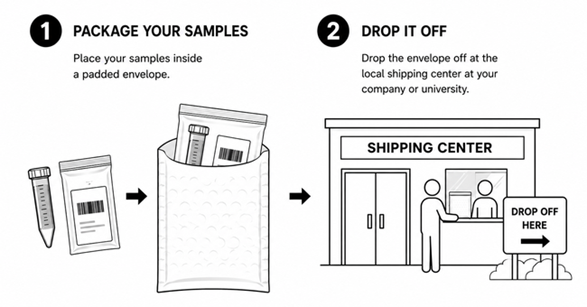
- Package your samples in padded mailer, padded envelope or cardboard shipping box. If you are reusing material, completely remove or cover any existing labels or warnings. Multiple orders may be shipped together in the same package, provided that each order is placed in its own sealed bag and includes the corresponding order confirmation.
- Ship samples at ambient (room) temperature. Do not include ice packs, dry ice, or other temperature-control materials.
- Ship using your company's standard shipping carrier (UPS, Fedex, DHL, etc). We strongly recommend shipping via the express option, e.g. overnight, next-day, express, first-class.
- For more information, visit the Ship Normally webpage.
|
SANGER TUBES ORDER PAGE - DONE
1. How to Prepare Samples
Go to the sample submission guidelines for ONT/Whole Plasmid samples or Sanger samples for instructions on how to prepare your samples.
2. How to Label Samples
Tubes (<48 samples)
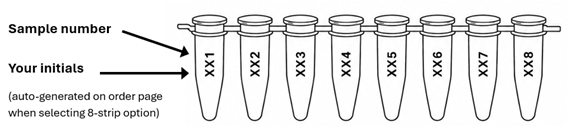
200 μL PCR 8-strip tubes
|
- Write the 3-character barcode on the side of the tube in clear handwriting using a thin sharpie marker. The order page automatically generates this barcode for you to make it easy.
- Do not write the sample name on the tube. The barcode (previous point) is enough. Adding the name typically slows down processing instead of speeding it up.
- The barcode is your initials followed by a number, e.g. John Doe would get the barcode JD1…JD2…JD3…etc.
- If using our free barcodes, press down firmly across the entire label to make sure it is secure.
- Always start on 1. If there are samples already sitting in your cart that start at 1, the order page will display the next available number, which is fine to use.
|
|
|
3. How to Package Samples
Tubes (<48 samples)
200 μL PCR 8-strip tubes
|
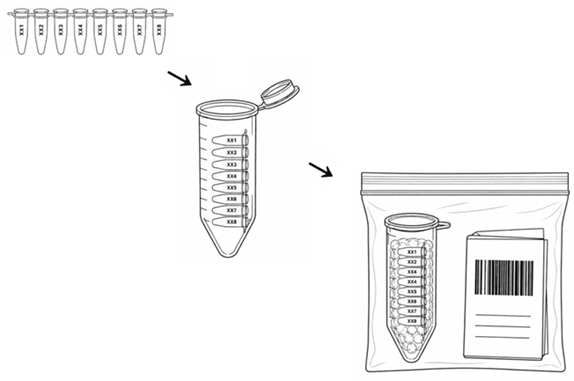
- Put the 8-strip inside a 50mL conical tube to protect during transit. It is a good idea to add some cushioning inside such as bubble wrap or cotton balls.
- Print your order confirmation page, fold it so that the order barcode and sample information is on top, and place the tube(s) and confirmation page in a ziplock bag.
- Do not cut up the 8-strip into separate tubes.
- Make sure the caps are firmly closed. Do not use the 8-strip tubes with caps that come off easily. An easy way to distinguish between them is to look if the tubes have individual caps or a strip of caps. Strip caps come off easily and should be avoided. Individual caps typically fit more snuggly.
- Do not use excessive parafilm to seal the tubes. This makes it difficult to open the tubes and can lead to contamination when opening the tubes. The conical tube should be enough to protect them in transit.
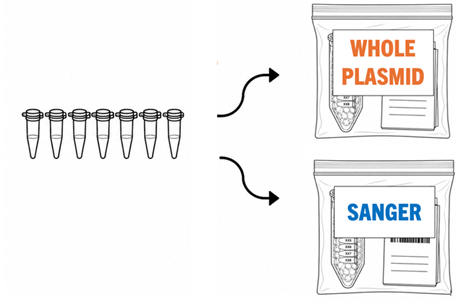
Separate Sample Types into Separate Bags
- It is important to separate Whole Plasmid and Sanger samples into different ziplock bags so the processing team can quickly sort packages and send the samples to the right sequencing group.
- Include the order confirmation page in each bag, with the order barcode and sample information visible through the bag.
|
|
|
4. How to Order Online
Order Page
Samples can be easily submitted using the excel upload template or manually entering the sample information and options. Please ensure that you provide a unique name for each sample and select the appropriate primer from the dropdown list. For 8-strip tubes, leave the barcode field empty in the excel upload form.
Primers
a) Universal Primers: Eurofins Genomics provides a wide variety of free, standard primers. Select these primers from the primer dropdown list.
b) Custom Synthesized Primer: Eurofins Genomics has a DNA synthesis laboratory, which gives us the unique ability to make custom primers for sequencing customers. To order a custom primer, enter the name in the Primer Name column and the sequence to synthesize in the "Enclosed primer barcode or the Sequence to Synthesize' column in the excel upload template. Alternatively, users can order custom primers from the on-screen order control found on step 2.
c) Sent/Enclosed Primer-if you are sending the primer with the sample, it is an enclosed primer. Enter the name in the 'primer name' column and the barcode (optional) in the 'Enclosed Primer Barcode or the Sequence to Synthesize' column. If you do not have a barcode, clearly label the tube with a marker or sharpie. Only enter digits in the ‘Enclosed Primer Barcode” column, otherwise, the system might read it as a custom primer sequence.
d) Stored Primer-primers that were already submitted with a previous order will be stored for a period of time (details below) and can be reused on future orders. To specify a stored primer, enter the name of your stored primer in the “Primer Name” field. The name should match the exact name shown on the My Primers page. Stored primers will also appear in the primer dropdown.
Primer storage
| Primer Type |
Default Storage |
Extended Storage |
| Ordered Primer |
6 months |
na |
| Sent Primer |
15 days |
1 month (optional) |
Barcodes
Barcodes are used to track samples in the lab. Please note that Standard and SimpleSeq barcodes can only contain digits. Please remove any hyphens, dashes, spaces, or periods before using a barcode.
- 8-strip barcodes: 8-strip tubes is the preferred submission method and we have made it extra easy for customers by automating the barcode-generation process. 8-strip barcodes are automatically generated by our system and displayed on the online order page. It will take the customers initials + #, e.g.) customer John Doe would see barcodes JD1...JD2...JD3. Please write these barcodes on the side of your tubes using a sharpie marker. If using the excel upload form, please leave the barcode field empty.
- Free standard barcodes: Eurofins Genomics provides free barcode labels on the supplies page. Please note that it may take 7-10 days for the free barcodes to arrive, so if you are in a hurry, use the 8-strip option.
- SimpleSeq barcodes: all SimpleSeq tubes come pre-labeled. Read the barcode on the side of the tube and enter it on the order page to redeem the SimpleSeq reaction.
Need help finding your barcode? Manage your stored and custom primers here. Also, SimpleSeq barcodes can be found here.
5. How to Submit Samples
For more details, go to the How to Submit Samples webpage.
Dropbox
- Drop samples in the box the same day the online order is placed. The courier pickups samples on-demand, not every day. If it is past the cutoff time, the courier will pickup the following business day.
- Package your samples in padded mailer, padded envelope or cardboard shipping box. If you are reusing material, completely remove or cover any existing labels or warnings. Multiple orders may be shipped together in the same package, provided that each order is placed in its own sealed bag and includes the corresponding order confirmation.
- Ship samples at ambient (room) temperature. Do not include ice packs, dry ice, or other temperature-control materials.
- Visit the dropboxes webpage for more information on dropbox options and details.
- Search for dropboxes near to your location.
|
Digital Shipping Label
- Select the digital shipping label option during checkout. It is found under the "sample submission method" option. Digital shipping labels are free as long as the order amount meets the threshold for free shipping, which usually around $30-35.
- A digital shipping label will be automatically generated on the order confirmation page. Print it.
- Cut out the shipping label Select the print option to print the label.
- Package your samples in padded mailer, padded envelope or cardboard shipping box. If you are reusing material, completely remove or cover any existing labels or warnings. Multiple orders may be shipped together in the same package, provided that each order is placed in its own sealed bag and includes the corresponding order confirmation.
- Ship samples at ambient (room) temperature. Do not include ice packs, dry ice, or other temperature-control materials.
- For more information, visit the Digital Shipping Label webpage.
|
Ship Normally
- Package your samples in padded mailer, padded envelope or cardboard shipping box. If you are reusing material, completely remove or cover any existing labels or warnings. Multiple orders may be shipped together in the same package, provided that each order is placed in its own sealed bag and includes the corresponding order confirmation.
- Ship samples at ambient (room) temperature. Do not include ice packs, dry ice, or other temperature-control materials.
- Ship using your company's standard shipping carrier (UPS, Fedex, DHL, etc). We strongly recommend shipping via the express option, e.g. overnight, next-day, express, first-class.
- For more information, visit the Ship Normally webpage.
|